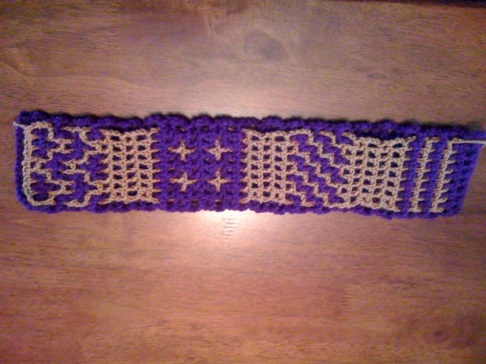
The best way to design your own multi-paneled Interlocking Crochet™ afghan or baby blanket is to make a sample. It’s not as hard or as time consuming as you might think. Actually since you’ll be able to see if the designs work together and catch any problems before you begin your project, it can actually save you time and effort.
Subscribe to My Crochet Channel or go to: YouTube.com TanisGalik
Start by choosing your designs. Take note of the statement – “This interlocking pattern works even over a multiple of # A-colored boxes.” Obviously, each design you use must work out mathematically with the other designs in your project. For example, if one design works evenly over 2 boxes and the other requires 4 boxes, you know you’ll be able to fit these together in adjacent panels.
However, if one design requires an odd number (4 + 1 A-colored boxes), then you’ll need to find another design, realize the even numbered design will not be centered perfectly or make some adjustments when working with the even numbered design (such as adding a plain box at the beginning or end of the even numbered rows) or just. You can work out these adjustments as you crochet your sample.
Don’t make the sample too large. Crochet a foundation mesh that will give you an adequate view of what the project will look like. For the designs requiring multiples of 2 boxes for the first panel, 4 boxes for the second panel and 2 boxes for the third panel, a foundation of 12 A-colored boxes should be sufficient.
Begin crocheting your first design. After one completion of the rows required to create that design, you’ll know how it will look and fit. You can make any adjustments needed for this design.
Add the first divider mesh rows. Carefully note: Are you working on the RS or WS? Do you drop the Color B to the back or front as you begin the row? Divider Row 1A is it dcib (worked in the back) or dcif (worked in the front)? Divider Row 1B is it dcib (worked in the back) or dcif (worked in the front)? Be sure to make these notations for each divider row until it is as wide as you wish, ending on WS.
Turn the entire piece and begin your next design. Continue adding the next divider and third panel in the same way as above until you are happy with your results.
Not only will you know how your afghan/baby blanket will look, you’ll uncover any problems or adjustments that need to be made before you have invested a lot of time or effort. You’ll also save yourself a lot of frustration by having a sample you know works instead of finding out in the middle of your project things just aren’t fitting together properly.

Are there instructions on how to write my own pattern using a grid image? I would like to learn how.
I work mine by trial and error. I first create a design in my mind or on paper and try to copy in by actually working the design in yarn. However, James Walters (an English designer) does have a method using graph paper. You can search for his website. After you create your design, you have to write the pattern based on that design. He might have instructions. I just write it following what I have worked out using the examples of the patterns from my book.
Tanis
Which software do you use to create your pattern after making your sample?
I don’t use any software. I do it the old fashion way, I write out the pattern as I experiment.
Tanis
Hi nice rreading your post